Ingredients
To make a smooth and creamy KitchenAid ice cream recipe, you’ll need high-quality ingredients. The freshness of your ingredients plays a crucial role in achieving the best texture and flavor. Below is a classic vanilla ice cream recipe, but you can easily customize it with additional flavors and mix-ins.
Basic Ingredients for Vanilla Ice Cream
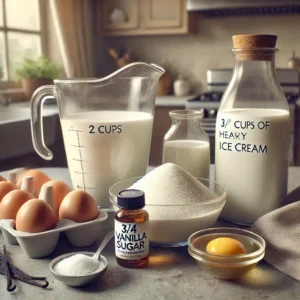
- 2 cups heavy cream – Provides a rich and creamy texture.
- 1 cup whole milk – Balances the consistency and enhances the smoothness.
- ¾ cup granulated sugar – Sweetens the ice cream while ensuring a soft texture.
- 1 tablespoon pure vanilla extract – Adds depth and aroma to the flavor.
- Pinch of salt – Enhances the overall taste by balancing sweetness.
- 4 large egg yolks (optional) – Used in custard-based ice cream for extra richness.
Optional Flavor Variations & Mix-Ins
- Chocolate Flavor: Add ¼ cup cocoa powder or ½ cup melted chocolate.
- Strawberry Flavor: Blend 1 cup fresh strawberries into the mixture.
- Cookies & Cream: Mix in crushed chocolate cookies after churning.
- Caramel Swirl: Drizzle homemade caramel sauce during the final mixing stage.
Using fresh and high-quality ingredients ensures that your KitchenAid ice cream recipe turns out creamy and delicious. With these ingredients ready, let’s move on to the essential equipment you’ll need!
Equipment Needed
To successfully make a creamy and smooth KitchenAid ice cream recipe, having the right tools is essential. The KitchenAid stand mixer, along with its ice cream maker attachment, plays a key role in achieving the perfect consistency. Below is a list of the necessary equipment to help you prepare your homemade ice cream efficiently.
Essential Equipment
- KitchenAid Stand Mixer – The main appliance used to churn the ice cream mixture smoothly.
- KitchenAid Ice Cream Maker Attachment – A special bowl that freezes the mixture while churning to create the perfect texture.
- Mixing Bowls – Used to combine and whisk ingredients before chilling.
- Whisk or Hand Mixer – Helps blend the ingredients evenly, especially when making a custard base.
- Spatula – Used to scrape down the mixture and fold in mix-ins like chocolate chips or fruit.
- Airtight Container – Necessary for storing the ice cream in the freezer to maintain freshness.
- Ice Cream Scoop – Helps serve perfect scoops of ice cream once it’s ready.
Optional Equipment
- Fine Mesh Strainer – Useful for straining out any lumps in a custard-based ice cream mixture.
- Thermometer – If using egg yolks, a thermometer helps monitor the custard temperature to avoid overcooking.
- Measuring Cups & Spoons – Ensures accuracy when measuring ingredients.
Having all the right equipment ready before starting your KitchenAid ice cream recipe will make the process easier and guarantee a smooth, creamy result. Now that you have everything you need, let’s move on to the preparation time!
Prep Time
Making the perfect KitchenAid ice cream recipe requires proper timing, from mixing the ingredients to freezing the final product. Below is the estimated time needed for each step to ensure a smooth and creamy homemade ice cream.
Estimated Preparation Time
- Mixing the Ingredients: 10 minutes
- Chilling the Ice Cream Base: 2–4 hours (or overnight for best results)
- Pre-Freezing the KitchenAid Ice Cream Bowl: At least 15 hours (recommended)
- Churning the Ice Cream: 15–20 minutes
- Final Freezing for Firmer Texture: 2–4 hours
Total Time Required
- Soft-serve consistency: ~6 hours
- Firm, scoopable texture: ~10 hours
Important Prep Tips
- Pre-freeze the ice cream maker bowl for at least 15 hours before making ice cream. This step is crucial for proper churning.
- Chill the ice cream mixture for a minimum of 2 hours before churning. Cold ingredients result in smoother ice cream.
- For custard-based ice cream, allow extra time to cook and cool the base properly before freezing.
By following this schedule, you’ll achieve the best consistency and flavor in your KitchenAid ice cream recipe. Now, let’s dive into the step-by-step method to bring it all together!
Step-by-Step Method
Follow this detailed KitchenAid ice cream recipe method to create a smooth, creamy, and delicious homemade ice cream. Each step ensures that the ice cream churns properly and develops the perfect texture.
1: Pre-Freeze the Ice Cream Maker Bowl
- Place the KitchenAid ice cream maker attachment bowl in the freezer for at least 15 hours.
- Ensure the freezer temperature is at -18°C (0°F) or lower for proper freezing.
Tip: If the bowl isn’t fully frozen, the ice cream won’t churn properly, leading to a soupy texture.
2: Prepare the Ice Cream Base
- In a mixing bowl, whisk together:
- 2 cups heavy cream
- 1 cup whole milk
- ¾ cup granulated sugar
- 1 tablespoon vanilla extract
- Pinch of salt
- Stir until the sugar is fully dissolved.
- If making a custard-based ice cream, heat the mixture in a saucepan over medium heat, stirring continuously. Slowly add 4 egg yolks, whisking constantly until thickened. Remove from heat and strain to remove lumps.
3: Chill the Mixture
- Transfer the ice cream mixture to an airtight container and refrigerate for at least 2 hours (or overnight for better results).
- Chilling ensures a smoother texture and enhances the flavors.
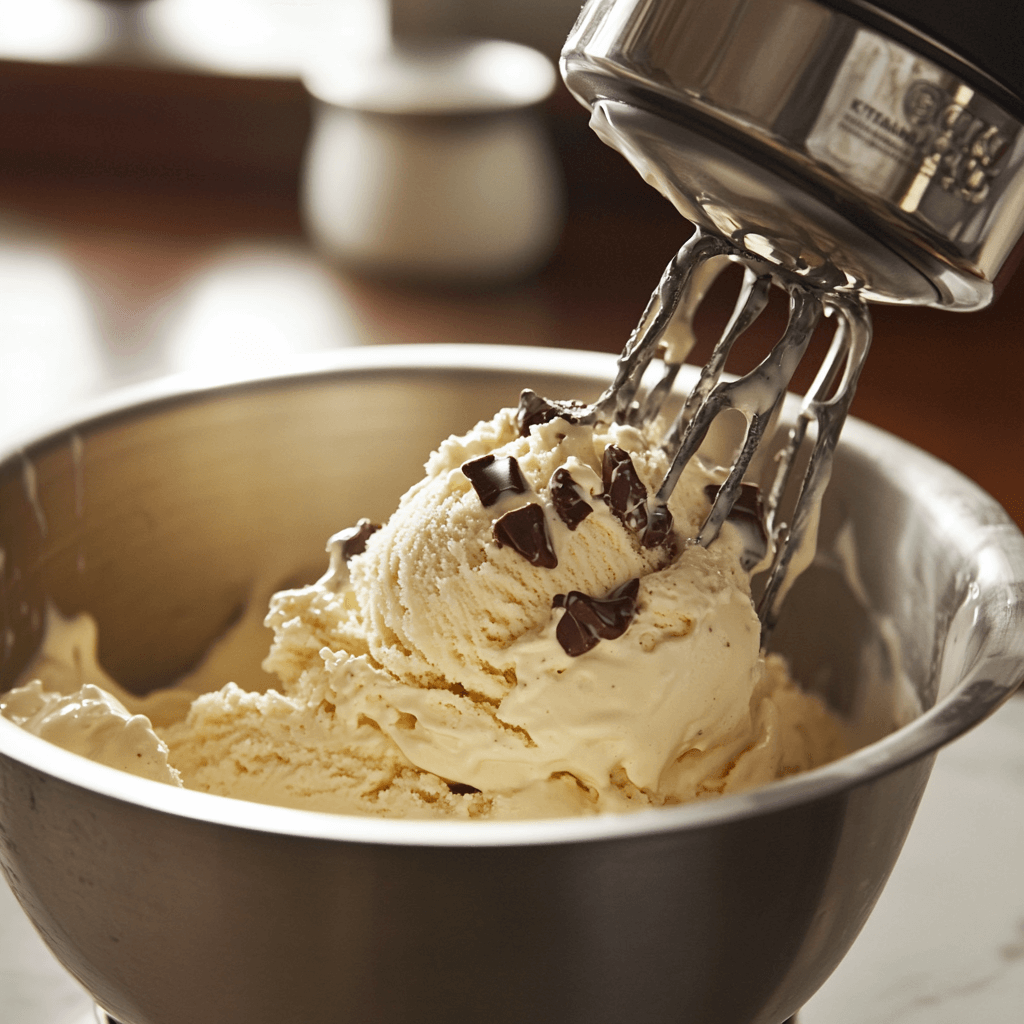
4: Churn the Ice Cream
- Attach the KitchenAid ice cream maker to your stand mixer.
- Turn the mixer to “Stir” speed (low speed) and slowly pour the chilled mixture into the frozen bowl.
- Let it churn for 15–20 minutes or until it reaches a soft-serve consistency.
Tip: Do not overfill the bowl. The mixture expands as it freezes.
5: Add Mix-ins (Optional)
- If adding chocolate chips, fruit, or cookie crumbles, add them in the last 5 minutes of churning.
6: Freeze for Firmer Ice Cream
- Transfer the churned ice cream to an airtight container.
- Smooth the top, cover with a layer of parchment paper or plastic wrap, and close the lid.
- Freeze for 2–4 hours for a firmer texture.
Your KitchenAid ice cream recipe is now complete! The next step is learning cooking tips to enhance flavor and texture even further.
Cooking Tips
To ensure that your KitchenAid ice cream recipe turns out creamy, smooth, and flavorful, follow these expert tips. Small adjustments in ingredients, churning, and freezing techniques can make a big difference in the final result.
1. Always Pre-Freeze the Ice Cream Maker Bowl
- Freeze the KitchenAid ice cream maker attachment bowl for at least 15 hours before using it.
- Place it in the coldest part of your freezer (not the freezer door) to maintain a steady freezing temperature.
- If the bowl isn’t frozen enough, the ice cream won’t churn properly and will remain soupy.
2. Chill the Ice Cream Base Before Churning
- After mixing the ingredients, refrigerate for at least 2 hours (or overnight for best results).
- A well-chilled base leads to faster churning and prevents ice crystals from forming.
3. Use Full-Fat Dairy for Creamier Texture
- Heavy cream and whole milk create the smoothest ice cream.
- Low-fat alternatives can be used but may result in an icier consistency.
- For dairy-free versions, use coconut milk or cashew milk for a rich and creamy texture.
4. Do Not Over-Churn the Ice Cream
- The ideal churning time is 15–20 minutes until the ice cream reaches a soft-serve consistency.
- Over-churning can cause the mixture to become grainy instead of smooth.
5. Add Mix-ins at the Right Time
- If using mix-ins like chocolate chips, nuts, or fruit, add them during the last 5 minutes of churning.
- Avoid adding large chunks as they can freeze too hard.
6. Use a Parchment Paper Layer to Prevent Ice Crystals
- Before freezing the churned ice cream, press a sheet of parchment paper or plastic wrap directly on top.
- This helps prevent ice crystals from forming, keeping your KitchenAid ice cream recipe creamy.
7. Let the Ice Cream Sit Before Scooping
- After freezing for a few hours, let the ice cream sit at room temperature for 5–10 minutes before scooping.
- This softens it slightly, making it easier to serve.
By following these tips, your KitchenAid ice cream recipe will have the perfect balance of smoothness, richness, and flavor. Now, let’s explore some delicious serving suggestions to elevate your homemade ice cream experience!
Serving Suggestions
Once you’ve perfected your KitchenAid ice cream recipe, it’s time to enjoy it in the most delightful ways. Homemade ice cream offers endless serving possibilities, whether you prefer a classic scoop or a more creative presentation.
1. Classic Cone or Bowl
The simplest way to serve your KitchenAid ice cream recipe is in a traditional waffle cone or a chilled dessert bowl. This allows the creamy texture to shine, and you can enhance it with a drizzle of chocolate syrup, caramel, or a dusting of cocoa powder.
2. Ice Cream Sundae
Elevate your dessert experience by making an indulgent sundae. Layer your KitchenAid ice cream recipe with whipped cream, nuts, sprinkles, and a cherry on top. You can also experiment with hot fudge, fruit syrups, or crushed cookies for extra flavor.
3. Ice Cream Sandwiches
For a fun and portable treat, scoop your KitchenAid ice cream recipe between two soft cookies or brownies. Press gently and freeze for an hour to firm up. This is a perfect option for parties or special occasions.
4. Milkshakes & Floats
Transform your KitchenAid ice cream recipe into a creamy milkshake by blending it with milk and your favorite add-ins, such as peanut butter or fruit. You can also create a float by adding a scoop of ice cream to a glass of soda or cold brew coffee for a refreshing twist.
5. Topped Over Waffles & Pancakes
For a breakfast-style dessert, place a scoop of your KitchenAid ice cream recipe over warm waffles or pancakes. The contrast of hot and cold creates a delicious combination, perfect for brunch or an after-dinner treat.
6. Ice Cream Cake Layers
Take your dessert to the next level by using your KitchenAid ice cream recipe as a filling between cake layers. Alternate ice cream with cake layers and freeze for a stunning homemade ice cream cake.
7. Fruit Pairings
If you enjoy a refreshing twist, serve your KitchenAid ice cream recipe with fresh fruits like berries, mangoes, or sliced bananas. The natural sweetness of the fruit complements the creamy texture of the ice cream.
With so many ways to enjoy your KitchenAid ice cream recipe, you can get creative and personalize it to your taste. Whether served simply or dressed up with toppings, this homemade treat is sure to impress family and friends!
Storage Tips
Proper storage is essential for maintaining the freshness, texture, and flavor of your KitchenAid ice cream recipe. Follow these expert tips to keep your homemade ice cream creamy and free from ice crystals.
1. Use an Airtight Container
- Store your ice cream in a shallow, airtight container to prevent air exposure.
- Plastic or glass containers with tight-fitting lids work best.
- Avoid using metal containers as they can give the ice cream a metallic taste.
2. Cover the Surface to Prevent Ice Crystals
- Place a piece of parchment paper, wax paper, or plastic wrap directly on top of the ice cream before sealing the lid.
- This extra layer helps prevent freezer burn and keeps the KitchenAid ice cream recipe smooth and creamy.
3. Store at the Coldest Part of the Freezer
- Keep the ice cream in the back of the freezer, where the temperature is most stable.
- Avoid storing it in the freezer door, as temperature fluctuations can cause ice crystals to form.
4. Maintain the Right Freezer Temperature
- Set your freezer temperature to -18°C (0°F) or lower to keep the ice cream firm and fresh.
- Fluctuating temperatures can ruin the texture and make it grainy.
5. Do Not Store Ice Cream Near Strong-Smelling Foods
- Ice cream can absorb odors from other foods in the freezer.
- Keep it away from strong-smelling items like onions or seafood.
6. Best Storage Time for Freshness
- Homemade KitchenAid ice cream recipe is best enjoyed within 1–2 weeks.
- While it may last up to a month, the texture may become icier over time.
7. Let Ice Cream Sit Before Scooping
- When ready to serve, let the ice cream sit at room temperature for 5–10 minutes to soften slightly.
- Avoid microwaving, as it can ruin the consistency.
By following these storage tips, your KitchenAid ice cream recipe will stay fresh, creamy, and delicious for as long as possible. Now, let’s take a look at its nutritional information to see what’s inside every scoop!
Nutritional Information
Understanding the nutritional breakdown of your KitchenAid ice cream recipe can help you make informed choices about portion sizes and ingredient substitutions. Below is an estimated nutritional profile for a standard serving (½ cup) of classic vanilla ice cream made with full-fat dairy.
Estimated Nutritional Values (Per ½ Cup Serving)
| Nutrient | Amount |
|---|---|
| Calories | 250-300 kcal |
| Total Fat | 18-22g |
| Saturated Fat | 10-12g |
| Cholesterol | 80-100mg |
| Carbohydrates | 20-25g |
| Sugars | 18-22g |
| Protein | 3-5g |
| Sodium | 50-75mg |
How to Adjust Nutritional Values
Lower-Calorie Options
- Use low-fat milk or almond milk instead of whole milk and heavy cream.
- Reduce sugar and use natural sweeteners like stevia or honey.
Higher Protein Options
- Add protein powder to the ice cream mixture.
- Use Greek yogurt instead of some of the cream.
Lower Sugar Options
- Replace sugar with erythritol or monk fruit sweetener.
- Use naturally sweet ingredients like mashed bananas or dates.
This KitchenAid ice cream recipe provides a rich and indulgent treat, but with a few tweaks, you can adjust it to fit different dietary needs. Now, let’s go over the common mistakes to avoid to ensure the best ice cream texture and taste!
Mistakes to Avoid
To achieve the perfect texture and flavor in your KitchenAid ice cream recipe, it’s important to avoid common mistakes that can ruin the consistency or taste of your homemade ice cream. Here are the most frequent errors and how to prevent them.
1. Not Pre-Freezing the KitchenAid Ice Cream Maker Bowl
- Mistake: Trying to churn ice cream with a bowl that isn’t fully frozen.
- Fix: Freeze the ice cream bowl for at least 15 hours at -18°C (0°F) or lower before churning. If the bowl isn’t cold enough, the ice cream won’t freeze properly and will stay runny.
2. Not Chilling the Ice Cream Base Before Churning
- Mistake: Pouring a warm or room-temperature mixture into the ice cream maker.
- Fix: Always chill the mixture for at least 2 hours (or overnight) before churning. A cold base freezes faster and prevents ice crystals from forming.
3. Over-Churning or Under-Churning
- Mistake: Churning too long makes ice cream grainy, while under-churning leaves it too soft.
- Fix: Churn for 15–20 minutes or until the mixture reaches a soft-serve consistency. Avoid exceeding this time, as over-churning can lead to butter-like separation.
4. Using Low-Fat Ingredients Without Adjustments
- Mistake: Replacing heavy cream with low-fat milk without adjusting the recipe.
- Fix: If using low-fat milk, add a stabilizer (like cornstarch or gelatin) to maintain creaminess. Dairy-free alternatives like coconut milk or cashew milk provide better results than skim milk.
5. Adding Mix-Ins Too Early
- Mistake: Adding chocolate chips, nuts, or fruit at the beginning of churning.
- Fix: Always add mix-ins during the last 5 minutes of churning. This prevents them from sinking to the bottom or becoming too hard.
6. Storing Ice Cream Improperly
- Mistake: Storing ice cream in containers that allow air exposure, leading to freezer burn.
- Fix: Use an airtight container and press a layer of parchment paper or plastic wrap directly onto the ice cream before sealing.
7. Freezing Too Long Without Stirring
- Mistake: Ice cream becomes too hard if left in the freezer for days without softening.
- Fix: Before serving, let the ice cream sit at room temperature for 5–10 minutes for easy scooping.
By avoiding these mistakes, your KitchenAid ice cream recipe will turn out smooth, creamy, and full of flavor every time. Now, let’s wrap things up with a final conclusion!
Conclusion
Making homemade ice cream with the KitchenAid ice cream recipe is a rewarding and delicious experience. With the right ingredients, proper equipment, and careful preparation, you can create smooth, creamy, and flavorful ice cream right in your kitchen.
By following the step-by-step method, chilling the base properly, and avoiding common mistakes, you ensure that your ice cream has the perfect texture every time. Whether you stick to classic vanilla or experiment with exciting flavors like chocolate, strawberry, or caramel swirl, the KitchenAid ice cream recipe allows for endless creativity.
Homemade ice cream is not only fresher and tastier than store-bought versions, but it also gives you complete control over the ingredients. You can make healthier versions, add fun mix-ins, or even create dairy-free alternatives. Plus, with the KitchenAid ice cream recipe, the churning process is effortless, making it a great choice for beginners and ice cream lovers alike.
Now that you have all the knowledge and tips to master the KitchenAid ice cream recipe, it’s time to start experimenting with flavors and enjoy your homemade frozen treats. Try out different variations, share your creations with family and friends, and savor every scoop of your delicious, creamy dessert!
If you’re looking for another fun and creative cookie recipe, try making recipe for banana pudding kids can make